Table of Contents
The Most Efficient One-Page Checkout Available
What Is the Checkout?
When we refer to the “checkout” we refer to the page (or pages, in other systems) where the customer enters their billing and payment information, and where they submit their order for processing. In general, the cart comes before the checkout, and the receipt is displayed when a successful checkout is processed.
How and Why FoxyCart's Checkout Is Different
One of the major pieces we wanted to simplify and improve upon when we started FoxyCart was the checkout page. In addition to making it a very dynamic one-page checkout, we also revolutionized (big hypey word, we know, but we feel it's true) the way customers choose between a guest checkout or creating an account.
No longer will your customers be presented with inputs for their email and password, only to submit the form and be told that they don't have a user, and that if they'd like to register they can click the teeny tiny link in the bottom right. Odds are they don't care about registering; they just want to buy your wares as quickly as possible. Our unique approach automatically determines whether the customer has an account, and also presents easy options to checkout as a guest user if desired (and configured for your store).
The checkout is also highly flexible, and can be modified in a variety of ways. HTML, CSS, and JavaScript are all available for you to perform advanced customizations both of the design and the functionality.
Checkout Template Customization
The checkout can be quickly, easily, and automatically styled to match your existing site's templates. This is care of “AutoMagiCache”. There are screencasts, examples, and lots of documentation about customizing your checkout template. And really, it's quite easy and automatic, so we strongly recommend reviewing the screencasts. A customized checkout can significantly boost conversion rates, so it's likely well worth your time to style your FoxyCart-powered checkout to match your site.
Errors On the Checkout
"Hard" Errors
Any “hard” errors will be displayed for your customers (and in your store's error log), and will generally be supplied by your payment gateway for things like a declined card, a mismatched billing address, or other issues that impact payment. See Errors and What To Do About Them for more info.
"Soft" Errors
FoxyCart's checkout also employs JavaScript validation to provide for quick feedback if a required field is left empty, if a shipping option is unselected, an email address malformed, etc. These errors will not show up in your store's error log.
Other Errors and Unexpected Behavior
Because the checkout is complex, there are a variety of things that can go wrong if you're customizing things. If things aren't happening as expected…
- Check for JavaScript errors using Firebug or the comparable debugging system in your browser of choice.
- Check for required fields you may have hidden via CSS.
- Make sure your checkout template has a doctype, and is free of major validation errors.
- Post on our forum for additional help.
Adding Custom Checkout Fields
Overview
Sometimes it is necessary or desirable to include additional input fields on checkout, such as:
- Checkbox to require Terms of Service agreement.
- Checkbox to opt-in to a mailing list.
- Input field for a referrer code.
- Checkbox to “send as a gift”, with a text area for a gift card note.
- Input field for date of birth.
It's (relatively) easy to add custom fields to your FoxyCart checkout page, providing you know some HTML. In a nutshell, any code you insert in between the tags ^^custom_begin^^ and ^^custom_end^^ will be inserted in your checkout page, in between a container div#fc_custom_fields_container.
An Example
Here's a basic example of the above functionality. It doesn't matter where you put this code. It will be moved into the checkout form when FoxyCart loads your checkout page, so it can be after the </body> or </html> tags if you want.
^^custom_begin^^

<h2>Additional Information</h2>

<fieldset id="fc_custom_fields">
	<legend>Additional Information</legend>
	<div class="fc_inner">
		<div>
			<h4>Updates</h4>
			<input type="checkbox" name="Update_List" value="yes" checked="checked" />
			<label for="Update_List">Leave this box checked to receive occasional updates about our products. We will not share your email address, and you can unsubscribe at any time.</label>

		</div>
		<div>
			<h4>Comments?</h4>
			<p>If you have any comments about your order, or about our checkout process, please let us know.</p>
			<textarea name="Comments" cols="35" rows="6"></textarea>
		</div>
	</div><!-- .fc_inner -->
</fieldset><!-- #fc_custom_fields -->

^^custom_end^^
This code will then be inserted in your checkout page, below the address fieldsets and above the shipping fieldset. It will be wrapped in a container div, like this:
<div id="fc_custom_fields_container" class="fc_fieldset_container">

<h2>Additional Information</h2>

<fieldset id="fc_custom_fields">
	<legend>Additional Information</legend>
	<div class="fc_inner">
		<div>

			<h4>Updates</h4>
			<input type="checkbox" name="Update_List" value="yes" checked="checked" />
			<label for="Update_List">Leave this box checked to receive occasional updates about our products. We will not share your email address, and you can unsubscribe at any time.</label>

		</div>
		<div>
			<h4>Comments?</h4>
			<p>If you have any comments about your order, or about our checkout process, please let us know.</p>
			<textarea name="Comments" cols="35" rows="6"></textarea>

		</div>
	</div><!-- .fc_inner -->
</fieldset><!-- #fc_custom_fields -->

</div><!-- #fc_custom_fields_container -->
What to name your fields
You can name your fields anything you want, but we recommend using the underscore (_) for spaces, and capitalizing your input names as you'd like them displayed. For all receipts, we will convert underscores to spaces for you.
For example, if you have <input name=“Update_List” />, it will be displayed in your receipt (and email receipts) as Update List.
What about Receipts and the Datafeeds?
The custom fields will be inserted at the bottom of your receipt (after checkout), as well as in any emails that include the ^^receipt^^ placeholder.
Custom checkout fields are included in all XML datafeeds from version 0.3.
What if I'm using multiship and I need a custom field per shipto?
No problem! Just wrap your custom fields in ^^multiship_custom_begin^^ and ^^multiship_custom_end^^ and you're good to go.
A Note about Checkboxes
Checkboxes do not post if they are unchecked. This is standard HTML form behavior, but it's worth noting, especially if you're using checkboxes for your XML datafeeds.
Required Fields
You can require a custom field by adding fc_required to its class (of the input). You can add an error message (which will display if it's left blank) by adding a label.fc_error with for=“your_field_name”, like this:
<label class="fc_error" style="display: none;" for="terms_of_service">Please accept our Terms of Service.</label>
For example, if you wanted to force a Terms of Service acceptance, it'd look like this:
^^custom_begin^^

<h2>Additional Information</h2>

<fieldset id="fc_custom_fields">
	<legend>Additional Information</legend>
	<div class="fc_inner">
		<div>
			<h4>Terms of Service</h4>
			<input type="checkbox" name="terms_of_service" value="accept" checked="checked" class="fc_required" />
			<label for="terms_of_service">By checking this box you agree to our <a href="http://www.YOURDOMAIN.com/tos">Terms of Service</a>.</label>
			<label class="fc_error" style="display:none;" for="terms_of_service">You must accept our Terms of Service to complete this transaction.</label>
		</div>
		<div>
			<h4>Comments?</h4>
			<p>If you have any comments about your order, or about our checkout process, please let us know.</p>
			<textarea name="Comments" cols="35" rows="6"></textarea>
		</div>
	</div><!-- .fc_inner -->
</fieldset><!-- #fc_custom_fields -->

^^custom_end^^
"Sensitive" Custom Checkout Fields
By default, all custom checkout fields will be emailed as part of the email receipt sent to both the customer and the store's email address. Emailing sensitive information is a Bad, Bad Idea. If you aren't familiar with the reasons why, please read our Security Primer for more info. If you do need to collect information that you do not want to be emailed, such as Social Security Numbers or other sensitive data, you can prefix your field names with h:, like this:
Please enter your Social Security Number: <input type="text" name="h:social_security_number" />
“Sensitive” fields are displayed in the admin's transaction view, and are sent in the XML, but are not emailed.
You should not be collecting passwords using custom fields, as they will be stored in cleartext and not hashed in our system. Though we work hard to keep our systems secure, it's just not a good idea to store passwords without a strong hashing algorithm.
Pre-Populating the Checkout with Customer Information
Though we generally recommend Single Sign-On and synching customers via the API, there are certain situations where you may want to pre-populate the customer's billing or shipping fields without using SSO or the API.
Pre-populating is done by passing in specific customer fields to the cart. Once the customer fields have been passed into the cart, they will remain there just like session variables, and when the checkout is loaded the values will be inserted into the appropriate fields on the checkout. Note that this does not impact the user's ability to change the data, nor does it impact the customer's ability to checkout as a guest or to create an account.
FoxyComplete: The checkout's country/state autocompleter
Multiple alternative spellings for each location
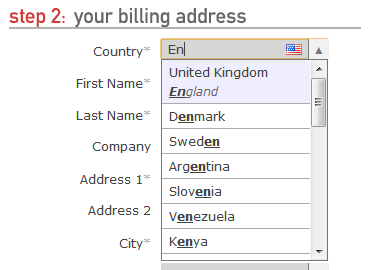 One main benefit of the new autocomplete is the ability for countries and states to have numerous different alternate spellings to allow customers to find locations in the way they're familiar. So for example, this means that a customer looking for “United Kingdom” could start typing “UK”, “GB”, “Great Britain”, “England” or “Britain” - with all of those resulting in the “United Kingdom” being a result in the autocomplete to select from. If the customer has typed in a name that is an alternate spelling for a location (eg: One that isn't the normal English spelling of the location), the alternate spelling they are matching against will also be displayed with the result (see the screenshot to the right for an example of that). This also means the autocomplete can match against different languages as well, for example 'Spain' can be matched against 'España', 'Russia' to 'Россия' and Japan to '日本'.
Relevancy sorting
Locations are also given weighting to help return the most relevant result based on a few different criteria, including where the search query appears in the matching location name (at the start of the name, start of a word in the string or elsewhere), and if they are matching against the main location spelling, or an alternate spelling. Locations are also given a relevancy boosting value, which is currently based off of global sales per country across all FoxyCart stores. For example, if you type in “United”, the United States and the United Kingdom would appear above other options that may be just as relevant and should appear first from an alphabetical ordering as they are a more common selection. All of this combined will help customers find the country and state they're looking for quicker and easier than ever.
Localised state labels and requirement status
The new autocompleter also takes into account if FoxyCart is aware of any states for the selected country or not. If a country has states present in the system, such as the United States, Australia and Germany, then the states inputs will also have the autocomplete functionality enabled and a selection would be required to checkout. If however a country is selected that doesn't have known states in the system (generally meaning that states may not be required for shipping), such as France, New Zealand, the Netherlands and Ireland, the state field is just a straight text input that can be left blank without error. The states field label is also customised to match the local way that states are referenced, with labels like 'State', 'Canton', 'County' and 'Province'. These labels are customisable from the checkout section of the 'language' page in the administration for your store.
Is there an alternate spelling that you think should be there, or an incorrect state label for a location that you've found? Get in contact with us and let us know and we'll get it added!
Configuration Options
FoxyComplete can be customised in a number of ways by utilising the configuration options present in the checkout object, allowing you to turn off the autocomplete entirely, and removing or customising certain aspects of its functionality. To apply any of these customisations, simply add a javascript block to your checkout template, right before the closing </head> tag of your checkout template like this:
<script type="text/javascript">
  FC.checkout.config.foxycomplete.enable = false;
</script>
-
enable - Description: A boolean to set whether FoxyComplete should be enabled on your checkout or not.
- Default:
true - Accepts:
trueorfalse - Example:
FC.checkout.config.foxycomplete.enable = false; - Note: Note that if FoxyComplete is disabled for the checkout, fields will instead show a select dropdown object for the country field and state field where pre-filled state locations are available. For states where no pre-filled states are available, an empty text input is shown instead.
-
comboBox - Description: A boolean to set whether FoxyComplete should display the comboBox button on the right of the input, which when clicked will open up the autocomplete results. This allows customers to operate the autocomplete easily with a mouse.
- Default:
true - Accepts:
trueorfalse - Example:
FC.checkout.config.foxycomplete.comboBox = false; -
comboBoxOpen - Description: A string to be used for the comboBox text shown on the button for opening the results. This is best set to a single character.
- Default:
“▼” - Accepts: Any string, preferably only a single character
- Example:
FC.checkout.config.foxycomplete.comboBoxOpen = “v”; -
comboBoxClose - Description: A string to be used for the comboBox text shown on the button for closing the results. This is best set to a single character.
- Default:
“▲” - Accepts: Any string, preferably only a single character
- Example:
FC.checkout.config.foxycomplete.comboBoxClose = “^”; -
flags - Description: A boolean to set whether the flag icon should be displayed on the right of the text input for the country fields.
- Default:
true - Accepts:
trueorfalse - Example:
FC.checkout.config.foxycomplete.flags = false;
Customising the styling
There are some default styles applied to the autocomplete aspects to make it display nicely. If you'd like to customise this past that point, simply overwrite the styles as you would for any other aspect of the checkout.
One specific thing to note is the way that the comboBox and flag icon are placed in the template. These items are placed absolutely, with its position based on the styling and positioning of the related location text input. For example, the width and height of the comboBox is set to the height of the text input (including its padding), and placed on its right hand side. When the comboBox is present, the text inputs width is reduced by the width of the comboBox, and added back in as padding - which means that the text input still remains the same width, but the actual space that text can be entered doesn't continue underneath the comboBox button. The flag icon is placed to the right of the text input, and to the left of the comboBox if it's present.
For the most part, this should work for just about any custom template you have for the checkout. If your design requires some customisation to the dimensions of the comboBox, simply overwrite its styling - noting that for its width and height styles you will need to set the rule to important by doing width: 30px !important;.
Adding custom validation to your Checkout
Often when adding custom fields or doing some advanced customisations, you need to prevent the checkout unless a specific situation has occured. For example, you may need to validate an age of a customer, or prevent the checkout if they haven't filled out a specific text box after selecting a checkbox.
To prevent the checkout from validating (and therefore preventing the checkout from submitting), you simply set the following javascript variable:
<script type="text/javascript">
  FC.checkout.config.isValid = false;
</script>
Setting that variable to false will prevent the checkout from submitting, and obviously, setting it to true will allow an order to complete. Note that if you're using this type of functionality, it's important to test thoroughly as if the isValid variable gets stuck on false in your javascript logic, your customer's
simply won't be able to check out.
As an example, this code will check a custom checkout text input which requires customers type in their age, and checks that they are over the age of 18.
<script type="text/javascript">
function ageCheck() {
  var custAge = jQuery("#CustomerAge").val();
  if (!isNaN(parseFloat(custAge)) && isFinite(custAge) && parseFloat(custAge) >= 18) {
    FC.checkout.config.isValid = true;
  } else {
    FC.checkout.config.isValid = false;
    alert("You must be over the age of 18 to purchase these products");
  }
}

// Run our custom validation before the checkout validates
FC.checkout.overload("validateAndSubmit", "ageCheck", null);
</script>
This type of setup can be expanded to show and hide error messages similar to how FoxyCart does with the default fields also.
Make sure that you're setting isValid to both true and false within your logic. If you just set it to false then the checkout will go nowhere.
Customising which Credit Card types are allowed on your Checkout
In some situations it is necessary to not allow certain credit cards to be used on a store, a common example being the need to prevent American Express cards due to a payment gateway restriction. You can customise this with a single line of javascript included in your checkout template. Simply paste the following code right before the closing </head> tag of your checkout template, and remove any cards that you need to.
<script type="text/javascript">
  FC.checkout.config.validPaymentCards = ["amex","discover","laser","maestro","mastercard","solo","switch","visa"];
</script>
As an example, if you could only allow Visa and MasterCard card types in your store, the javascript would look like this:
<script type="text/javascript">
  FC.checkout.config.validPaymentCards = ["mastercard","visa"];
</script>
To hide the unaccepted credit card images on the checkout you'll also need to update the pay with credit card checkout language string in your FoxyCart admin under the language settings.
Other Checkout Actions
The checkout is primarily used to pay for new purchases, but there are certain other situations that arise that are still handled through the checkout. It's important to understand when your checkout can be used for other purposes so you can design and style accordingly.
Subscription Cancellation
 If you're doing recurring billing you may likely be using
 sub_cancel links in your email receipts, which will allow your customers to follow a sub_token link with sub_cancel=true. This will immediately redirect the customer to your checkout, but it is a highly streamlined checkout experience geared only towards allowing your customer to cancel their subscription. As you can see in the example to the right, the checkout includes just three main pieces:
- The normal email + password authentication section.
- The cart.
- The button that is normally labelled something like “checkout” or “confirm your order”, but is now labelled “Cancel My Subscription”. (This text can be modified in your store's language section.)
It is important to note that the password is still required in order to confirm the cancellation. This is to prevent an unauthorized user from modifying a subscription they aren't supposed to be modifying.
"Update Info" Requests
If the cart parameter is set to updateinfo, the cart will immediately redirect to the checkout in “updateinfo” mode. Simply put, this will process an empty transaction, thus allowing the customer to update their password, address(es), or payment info. This updated information will be sent in a transaction datafeed, but the payment gateway will not be contacted during this checkout.
The updateinfo process can be useful in certain situations, but especially if you're handling subscriptions you'll likely want to use the sub_token rather than the updateinfo approach.